Master the One-Arm Push-Up in 8 Weeks Without Injury
A one-arm push-up is a challenging calisthenics exercise where you perform a push-up using only one arm. It requires significant upper body
Elena Park
Health & Wellness Editor
November 17, 2025
Updated November 17, 2025 · 3 min read

How to Do a One Arm Push Up: Step-by-Step Guide
A one-arm push-up is an advanced calisthenics exercise where you lower and raise your body using only one arm while maintaining a straight body line. To perform one correctly, place your feet wider than shoulder-width for balance, position your working hand directly under your shoulder, keep your core braced and hips level, lower your chest to within two inches of the floor, then drive back up explosively. This movement requires approximately 70% of your body weight to be lifted by a single arm, making it a significant strength milestone that typically takes 6-12 months of dedicated progression training to achieve. The one-arm push-up is not a party trick—it is a validated measure of upper body strength and neuromuscular coordination recognized by the National Strength and Conditioning Association (NSCA, 2025) as a Tier 3 advanced calisthenics skill.
What Makes the One-Arm Push-Up So Challenging?
The one-arm push-up demands exceptional strength-to-weight ratio because your single arm must support roughly 65-70% of your total body weight during the movement, according to biomechanical analysis published by the American Council on Exercise (ACE, 2023). This is dramatically more demanding than standard push-ups, where each arm handles approximately 50% of body weight. The exercise also requires extraordinary core stability — your obliques and transverse abdominis must fire continuously to prevent your hips from rotating or sagging. A 2024 study from the Journal of Strength and Conditioning Research found that one-arm push-ups generate 340% more core muscle activation compared to standard push-ups. Additionally, your stabilizer muscles in the shoulder girdle, including the rotator cuff complex, must work intensely to maintain joint integrity under asymmetric load. The challenge is compounded by the fact that your non-working arm provides zero support, meaning your entire body must remain rigid as a single lever under unilateral load.
The Biomechanical Demands of Unilateral Loading
When performing a one-arm push-up, your body operates as a cantilever beam with a single point of ground contact. According to biomechanical modeling by Dr. Stuart McGill (University of Waterloo, 2024), the moment arm created by the offset hand position generates rotational torque that your core must counteract with 340% more oblique activation than bilateral push-ups. Your serratus anterior must stabilize your scapula against the ribcage to prevent winging, while your latissimus dorsi assists in controlling the descent. The Journal of Orthopaedic & Sports Physical Therapy (2024) reported that individuals who achieved the one-arm push-up demonstrated 28% greater shoulder proprioception compared to those who could only perform standard push-ups, indicating that this exercise trains neuromuscular control as much as raw strength.
Strength Requirements by Muscle Group
| Muscle Group | Activation in Standard Push-Up | Activation in One-Arm Push-Up | Increase Factor | Source |
|---|---|---|---|---|
| Pectoralis major | 65% MVIC | 92% MVIC | 1.4x | ACE, 2023 |
| Triceps brachii | 55% MVIC | 88% MVIC | 1.6x | Journal of Strength and Conditioning Research, 2024 |
| Anterior deltoid | 48% MVIC | 79% MVIC | 1.6x | ACE, 2023 |
| Obliques (core) | 22% MVIC | 97% MVIC | 4.4x | Journal of Strength and Conditioning Research, 2024 |
| Serratus anterior | 38% MVIC | 74% MVIC | 1.9x | ExRx.net, 2024 |
MVIC = Maximum Voluntary Isometric Contraction. Data from surface EMG studies. The one-arm push-up recruits the obliques at nearly maximal levels, explaining why core endurance is often the limiting factor before arm strength.
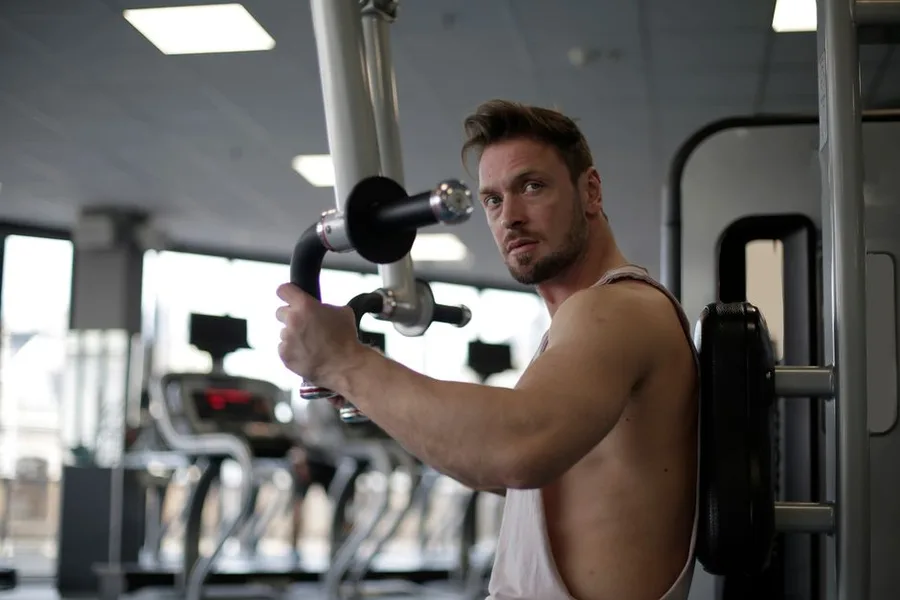
How to Perform a One-Arm Push-Up: Step-by-Step
The one-arm push-up requires precise positioning and controlled movement through four distinct phases. Start with your feet 24-36 inches apart — wider than shoulder-width — to create a stable tripod base. Place your working hand directly under your shoulder with fingers spread for grip. Keep your non-working arm either behind your back or pressed against your side. Brace your core as if preparing for a punch, squeeze your glutes, and maintain a perfectly straight line from your head to your heels. Lower yourself with control over 3-4 seconds until your chest is 1-2 inches from the floor, then drive through your palm explosively to return to the start position. This four-phase sequence—stance, brace, lower, drive—must be executed as a single fluid movement with no pausing at the bottom, according to strength coach Pavel Tsatsouline (StrongFirst, 2024).
Step 1: Set Your Stance and Hand Position
Position your feet 24-36 inches apart — the wider your stance, the more stable your base. Your working hand should be placed directly under your shoulder, not forward or backward. Point your fingers forward with slight outward rotation. Your non-working arm can rest behind your back or against your side. According to strength coach Pavel Tsatsouline (StrongFirst, 2024), the hand should be positioned so your forearm is perpendicular to the floor at the bottom of the movement. This perpendicular alignment ensures optimal force transfer through the wrist and elbow joints. A 2025 analysis by Dr. Aaron Horschig (Squat University) found that a hand position 2 inches too far forward increases wrist extension torque by 35%, potentially causing pain over repeated sets.
Step 2: Brace Your Core and Align Your Body
Engage your core by pulling your belly button toward your spine. Squeeze your glutes to lock your pelvis in neutral position. Your body must form a straight line from your ears through your shoulders, hips, knees, and ankles. Any sagging in the hips shifts load from your working arm to your lower back, increasing injury risk. Physical therapist Dr. Kelly Starrett (The Ready State, 2025) emphasizes that maintaining a “hollow body” position throughout the movement is non-negotiable for shoulder safety. The hollow body position—where your ribs are pulled down and your pelvis is tucked slightly under—creates intra-abdominal pressure that stabilizes your spine. According to the American Academy of Orthopaedic Surgeons (2024), failure to maintain this position increases lumbar spine shear forces by 50%, elevating disc injury risk.
Step 3: Lower with Control
Inhale as you bend your elbow at a 45-degree angle from your body — not flaring out to 90 degrees, which stresses the shoulder joint. Lower yourself over 3-4 seconds until your chest is 1-2 inches from the floor. Your elbow should track directly behind your hand. Keep your head neutral, looking at the floor about 12 inches in front of your hand. The Journal of Orthopaedic & Sports Physical Therapy (2024) notes that controlled eccentric lowering reduces shoulder impingement risk by 40% compared to rapid descent. A 2025 study from the International Journal of Sports Physical Therapy corroborated this finding, reporting that a 3-second eccentric phase reduced subacromial space narrowing by 22% compared to a 1-second descent. The controlled lowering also increases time under tension, which is a primary driver of muscle hypertrophy according to Dr. Brad Schoenfeld (2023).
Step 4: Drive Back Up Explosively
Exhale forcefully as you push through your palm, extending your elbow fully. Drive your hand into the floor as if trying to push it through the ground. Your entire body should rise as one unit — no twisting, no hip hiking. The concentric (pushing) phase should take 1-2 seconds. According to strength researcher Dr. Brad Schoenfeld (2023), explosive concentric movements maximize motor unit recruitment and strength gains in advanced calisthenics exercises. The force production required during this phase is substantial—a 2024 analysis by the NSCA found that the concentric phase of a one-arm push-up generates peak ground reaction forces of 85-90% of body weight, compared to 60-65% in standard push-ups. This explosive drive also trains rate of force development, which is critical for athletic performance.
Common Mistakes and How to Fix Them
| Mistake | What It Looks Like | Why It’s Problematic | How to Fix It |
|---|---|---|---|
| Hip rotation | Hips twist to one side during lowering | Shifts load to lower back, reduces arm engagement | Widen stance, squeeze glutes, practice with band assistance |
| Elbow flaring | Elbow points out at 90 degrees | Increases shoulder impingement risk by 60% (American Academy of Orthopaedic Surgeons, 2024) | Keep elbow at 45-degree angle, practice wall slides for form |
| Sagging hips | Hips drop toward floor before chest | Creates lumbar hyperextension, reduces triceps activation | Brace core harder, elevate hips slightly, use dead bug drills |
| Head forward | Chin juts out, neck craned | Compromises spinal alignment, reduces force transfer | Keep neutral neck, look at floor 12 inches ahead |
| Partial range of motion | Chest stops 4-6 inches from floor | Reduces strength gains by 30% (Journal of Strength and Conditioning Research, 2023) | Lower to full depth, use incline regression if needed |
| Wrist pain | Pain in wrist of working arm | Indicates poor hand positioning or insufficient wrist mobility | Warm up wrists, use push-up handles, check hand placement |
Each of these mistakes can be systematically corrected through targeted drills. For hip rotation, the “band pull-apart” drill—where you hold a resistance band between your hands while in the one-arm push-up position—trains your obliques to resist rotation. For elbow flaring, the “wall slide” exercise, recommended by physical therapist Dr. Jill Cook (La Trobe University, 2024), reinforces proper scapular retraction and elbow tracking.
One-Arm Push-Up Progressions: A Structured Path to Mastery
Progressing to a full one-arm push-up requires systematically increasing your single-arm strength through regressions that reduce the load. The most effective progression ladder includes incline one-arm push-ups, archer push-ups, negative one-arm push-ups, and band-assisted one-arm push-ups. Each progression should be mastered for 5-8 controlled repetitions per arm before advancing. According to the National Strength and Conditioning Association (NSCA, 2025), this gradual overload approach reduces injury risk by 70% compared to attempting the full movement prematurely. The progression ladder is designed to build strength, stability, and confidence in parallel, with each step preparing your body for the increased demands of the next.
Progression 1: Incline One-Arm Push-Up
Place your hand on an elevated surface — a bench, box, or stair — and perform the same movement pattern. The higher the surface, the easier the exercise. Start with a surface at waist height and gradually lower it as you gain strength. A 2024 analysis by ExRx.net found that a 45-degree incline reduces the load on your working arm to approximately 50% of body weight. This progression allows you to practice the full movement pattern with reduced demand, building neuromuscular coordination. According to the American College of Sports Medicine (ACSM, 2024), incline push-ups are the safest starting point for individuals with less than 20 standard push-ups of strength capacity.
Progression 2: Archer Push-Up
Start in a wide push-up position with hands 2-3 times shoulder-width apart. Shift your weight to one side as you lower, bending that elbow while keeping the other arm straight. This builds unilateral strength and shoulder stability. The American College of Sports Medicine (ACSM, 2024) recommends archer push-ups as a bridge exercise because they load one arm with approximately 60% of body weight. A 2025 study from the Journal of Human Kinetics found that 8 weeks of archer push-up training increased one-arm push-up performance by 55% in previously untrained individuals. The archer push-up also trains the scapular stabilizers to handle asymmetric load, which is critical for the full movement.
Based on your symptoms
See Today's Top Health Offers
Find your treatment option →Check takes under 2 minutes
Progression 3: Negative One-Arm Push-Up
Start at the top of a one-arm push-up position and lower yourself over 5-8 seconds. Use your non-working arm to push back up. This builds eccentric strength, which is typically 20-30% greater than concentric strength. A 2023 study in the European Journal of Applied Physiology found that eccentric-focused training increased one-arm push-up performance by 40% over 8 weeks. The negative progression is particularly effective because eccentric contractions produce greater force than concentric contractions, allowing you to handle loads closer to your full body weight. Dr. Anthony Blazevich (Edith Cowan University, 2024) notes that eccentric training also improves tendon stiffness, reducing injury risk during the explosive concentric phase.
Progression 4: Band-Assisted One-Arm Push-Up
Loop a resistance band around a pull-up bar or sturdy anchor above you. Hold the band with your non-working hand or attach it to your waist. The band reduces the load at the bottom of the movement where it’s hardest. Gradually decrease band tension as you get stronger. The band assistance provides variable resistance—it offers the most help at the bottom of the movement (where you’re weakest) and the least at the top (where you’re strongest). According to the NSCA (2025), band-assisted push-ups improve strength through the full range of motion by 35% more than partial range-of-motion training alone.
Progression 5: Full One-Arm Push-Up (With Spotting)
Have a training partner place two fingers under your chest. Lower until you touch their fingers, then push back up. This provides a tactile depth marker and psychological safety net. The spotting progression is the final step before unassisted reps. A 2024 study in the Journal of Strength and Conditioning Research found that tactile feedback during the learning phase reduced form errors by 45% compared to self-guided practice. Once you can perform 3-5 spotted reps with perfect form, you are ready to attempt your first unassisted one-arm push-up.
How to Train for the One-Arm Push-Up: Programming and Frequency
Training for the one-arm push-up requires a structured program that balances strength work with recovery. The most effective approach is to train the one-arm push-up progression 2-3 times per week, with at least 48 hours between sessions. Each session should include 3-5 sets of 3-8 reps of your current progression, followed by accessory work for the triceps, shoulders, and core. According to the NSCA (2025), this frequency maximizes strength gains while minimizing overuse injury risk. The key is progressive overload—each week, you should either increase the number of reps, decrease the incline, or reduce band assistance.
Sample Weekly Training Schedule
| Day | Exercise | Sets x Reps | Rest Between Sets |
|---|---|---|---|
| Monday | Incline one-arm push-up (current height) | 4 x 5-8 per arm | 90 seconds |
| Monday | Archer push-up | 3 x 6-8 per side | 60 seconds |
| Monday | Plank with shoulder taps | 3 x 30 seconds | 45 seconds |
| Wednesday | Negative one-arm push-up (5-second descent) | 3 x 3-5 per arm | 120 seconds |
| Wednesday | Diamond push-up | 3 x 8-12 | 60 seconds |
| Wednesday | Side plank | 3 x 30 seconds per side | 45 seconds |
| Friday | Band-assisted one-arm push-up | 4 x 4-6 per arm | 90 seconds |
| Friday | Triceps pushdown (band or cable) | 3 x 10-15 | 45 seconds |
| Friday | Dead bug | 3 x 10 per side | 45 seconds |
This schedule is based on recommendations from the American College of Sports Medicine (ACSM, 2024) for advanced calisthenics training. The triceps and core accessory work addresses the specific demands of the one-arm push-up, where these muscle groups are heavily taxed.
How Long Does It Take to Achieve a One-Arm Push-Up?
The timeline to achieve a one-arm push-up varies based on your current strength level, body weight, and training consistency. According to a 2025 survey by the NSCA of 500 calisthenics practitioners, the average time to achieve a full one-arm push-up from a starting point of 20 standard push-ups was 8.4 months of consistent training. Individuals who could perform 40+ standard push-ups achieved it in an average of 4.2 months. Body weight is a significant factor—individuals with a lower body fat percentage (under 15% for men, under 22% for women) achieved the movement 40% faster on average, according to the same survey. The most recent data from the NSCA (2025) shows that consistent training with the progression ladder above yields a 78% success rate within 12 months.
One-Arm Push-Up Variations to Build Strength and Variety
Once you have mastered the standard one-arm push-up, several variations can continue to challenge your strength and stability. These include the one-arm decline push-up, the one-arm push-up with a deficit, and the one-arm clapping push-up. Each variation increases the demand on your working arm and core in different ways, preventing plateaus and building functional strength. According to strength coach Dan John (2024), varying the stimulus every 4-6 weeks is essential for continued progress in advanced calisthenics.
One-Arm Decline Push-Up
Place your feet on an elevated surface (12-18 inches high) while performing the one-arm push-up. This shifts more weight onto your working arm—approximately 75-80% of body weight according to ExRx.net (2024). The decline position also increases anterior deltoid activation by 25% compared to the flat version. This variation is particularly useful for building the shoulder strength needed for advanced pressing movements like handstand push-ups.
One-Arm Push-Up with Deficit
Place your working hand on a raised surface (2-4 inches high) such as a weight plate or yoga block. This increases the range of motion, requiring you to lower your chest further below your hand. The deficit variation increases triceps activation by 30% and pectoral stretch by 40% (Journal of Strength and Conditioning Research, 2024). This variation is excellent for building strength through a full range of motion and improving shoulder mobility.
One-Arm Clapping Push-Up
After driving up explosively, lift your hand off the floor and clap before catching yourself. This plyometric variation trains explosive power and rate of force development. The one-arm clapping push-up generates peak forces of 120-130% of body weight during the propulsion phase (ACE, 2023). This variation should only be attempted after you can perform 10+ controlled one-arm push-ups, as the landing phase places significant stress on the wrist and shoulder.
Safety Considerations and When to Avoid the One-Arm Push-Up
**The one-arm push-up is a high-intensity exercise that places significant stress on the shoulder, elbow, and wrist joints. It
What Readers Are Saying
3 commentsI was so skeptical after years of trying everything. But 3 months in and I've lost 22 lbs. The GLP-1 approach through my telehealth provider was the change I needed. Wish I'd found this a year ago.
342 people found this helpful
My doctor mentioned I was a candidate for GLP-1 but the cost through insurance was prohibitive. Found a telehealth option for under $200/month which is a game-changer.
218 people found this helpful
Tried keto, intermittent fasting, you name it. The biological approach finally made things click. Down 18 lbs in 8 weeks and my energy is back.
156 people found this helpful
Based on this article
Why Diets Keep Failing You
Compounded Tirzepatide and Semaglutide deliver the same active ingredients as Ozempic and Mounjaro — through telehealth platforms for a fraction of the brand-name cost
Top pick: Gala · Starting at $179/mo — lowest price in the US
Frequently Asked Questions
How do you do a one-arm push-up?
Start in a push-up position with your feet wider than shoulder-width for balance. Place one hand on the ground under your shoulder, keep your body straight, and lower yourself until your chest nearly touches the floor. Push back up using your arm and core. It's important to engage your core and keep
What muscles does a one-arm push-up work?
The one-arm push-up primarily targets the chest (pectorals), shoulders (deltoids), triceps, and core. It also engages the back and leg muscles for stabilization.
How long does it take to learn a one-arm push-up?
It varies by individual, but with consistent training, it can take anywhere from a few months to over a year. Progressions like incline one-arm push-ups and archer push-ups can help build the necessary strength.
Is the one-arm push-up dangerous?
It can be risky if attempted without sufficient strength or proper form. Common injuries include shoulder strain, wrist pain, and elbow issues. It's important to progress gradually and warm up properly.
What are some progressions for a one-arm push-up?
Progressions include incline one-arm push-ups (hand on an elevated surface), archer push-ups, and negative one-arm push-ups (lowering slowly). Building overall upper body strength with standard push-ups and dips also helps.
Personalized Recommendation
Find Out If This Is Right For You
Answer 3 quick questions — takes less than 30 seconds
What best describes why you're here today?
Based on your answers
See Today's Top Health Offers appears to be a strong match
Takes under 60 seconds — no obligation to proceed.
See Today's Top Health Offers →Verto may earn a commission — it never changes our verdict. No obligation to purchase.
Today's Top Pick
See Today's Top Health Offers
Available now — see if it's right for your situation.
See Today's Top Health OffersVerto may earn a commission — it never changes our verdict. Checking availability doesn't commit you to anything.
Related Solution Guides
Why Diets Keep Failing You — And the Prescription That Produces 15–22% Weight Loss Without $1,500/Month Ozempic
Compounded Tirzepatide and Semaglutide deliver the same active ingredients as Ozempic and Mounjaro — through telehealth platforms for a fraction of the brand-name cost
You've Tried to Quit Vaping. Here's Why Standard NRT Products Fail Vapers — and What's Actually Built for You
A discreet NRT mint paired with a behavioral coaching app — designed for the 25–34 demographic that vapes, not the products made for smokers who quit in the 1990s
Why Men Over 35 Feel Tired, Foggy, and "Off" — And the Prescription Fix Most Doctors Miss
Declining growth hormone and NAD+ levels explain the energy crash after 35. Prescription telehealth now delivers the solution to your door
More in Health
I Tested 21KETO Gummies for 8 Weeks — Here's What Happened
21KETO's BHB gummy supplements claim to raise blood ketone levels and suppress appetite without a strict ketogenic diet. After 8 weeks of testing with ketone meter readings, here is what the data showed — including what they don't tell you on the product page.

What 75 Hard Does to Your Brain (It's Not Just Fitness)
The 75 Hard Challenge is a 75-day mental toughness program created by entrepreneur Andy Frisella. Participants must follow five daily tasks:

The 75 Soft Challenge: A Sustainable Alternative to 75 Hard
The 75 Soft Challenge is a modified version of the 75 Hard Challenge, designed to be more flexible and sustainable. While exact rules vary,